The Best Vegan Layer Cake for Any Occasion
This Vegan Layer Cake is one of those sweet treats that’ll surprise you with just how easy it is to pull off! Have you ever stared at a vegan cake recipe and thought, “Ugh, this looks scary and complicated”? Yep, that used to be me. I always thought vegan baking was some big fancy secret that only pro bakers knew. But I was so wrong.
This cake is super simple. I’m talking about ingredients you probably already have sitting in your pantry right now. Nothing weird. Nothing you have to hunt down in five different stores. And the best part? You can mix the whole thing by hand in one bowl. No fancy mixers. No stress.
The flavor is almond heaven. It’s soft, fluffy, and tastes just as good as any cake you’ve had. Honestly, you wouldn’t even know it’s vegan unless someone told you.
Let me walk you through exactly how I made this beauty. Trust me, you’ve got this.
WHY YOU WILL LOVE THIS RECIPE
- Easy method – You can mix the whole thing by hand in just one bowl.
- Simple ingredients – No fancy or hard-to-find stuff, just pantry basics.
- Soft and fluffy texture – The cake layers turn out light, tender, and perfect.
- Almond flavor perfection – The almond taste really shines and makes it special.
- Vegan frosting that actually tastes good – Made with vegetable shortening and still super yummy.
- Great for any occasion – This cake is pretty enough for parties but simple enough for a weekend bake.
INGREDIENTS FOR THE BEST VEGAN LAYER CAKE
Dry ingredients
- 2 ½ cups all-purpose flour
- 1 ¾ cups granulated sugar (use organic or certified vegan sugar)
- 1 ½ teaspoons baking soda
- ½ teaspoon salt
Wet ingredients
- 1 ½ cups unsweetened vanilla almond milk
- ⅔ cup vegetable oil
- 1 tablespoon alcohol-free vanilla flavoring
- 1 ½ teaspoons alcohol-free almond flavoring
- 1 tablespoon white vinegar
For the frosting
- 1 cup vegetable shortening
- 4 cups powdered sugar
- 1 tablespoon alcohol-free vanilla flavoring
- 1 teaspoon alcohol-free almond flavoring
- 1-2 tablespoons unsweetened vanilla almond milk (adjust for texture)
Decorations
- Vegan sprinkles
STEP BY STEP INSTRUCTIONS
- STEP 1). Grab a big bowl and toss in your flour, sugar, baking soda, and salt. Use a whisk and give everything a good mix. I like to think of this as waking up the dry ingredients and telling them it’s time to party!
- STEP 2). Now let’s bring in the wet crew. Pour in the almond milk and oil, then add that lovely alcohol-free vanilla flavoring and the almond flavoring. Mix, mix, mix until your batter looks smooth and there are no flour clumps hanging around. Seriously, don’t leave those sneaky lumps behind.
- STEP 3). Here comes the secret weapon, vinegar! This is what makes the cake rise and get all fluffy. Add the vinegar last and gently stir it in. You’ll see some bubbles popping up, and that’s our little science magic happening right there.
- STEP 4). Grab three six-inch cake pans and spray them with nonstick spray. Pop in parchment rounds at the bottom. I know cutting those circles is kinda annoying, but trust me, it’s worth it. Pour the batter evenly into the pans. I usually eyeball it, but if you want to be fancy, you can weigh them to make sure they’re even.
- STEP 5). Bake the cakes in a preheated oven at 350°F, that’s about 175°C, for 30 minutes. The waiting is the hardest part, right? Once they’re done, let them cool completely. You can level the tops if you want that super neat layered look, but honestly, they bake pretty flat already so no pressure.
- STEP 6). While your cakes are chilling, let’s whip up the frosting. Beat the vegetable shortening until it’s soft and smooth. Slowly add in the powdered sugar while mixing. Stir in the alcohol-free vanilla and almond flavorings. If it feels too thick, just splash in a little almond milk until it’s creamy but not runny.
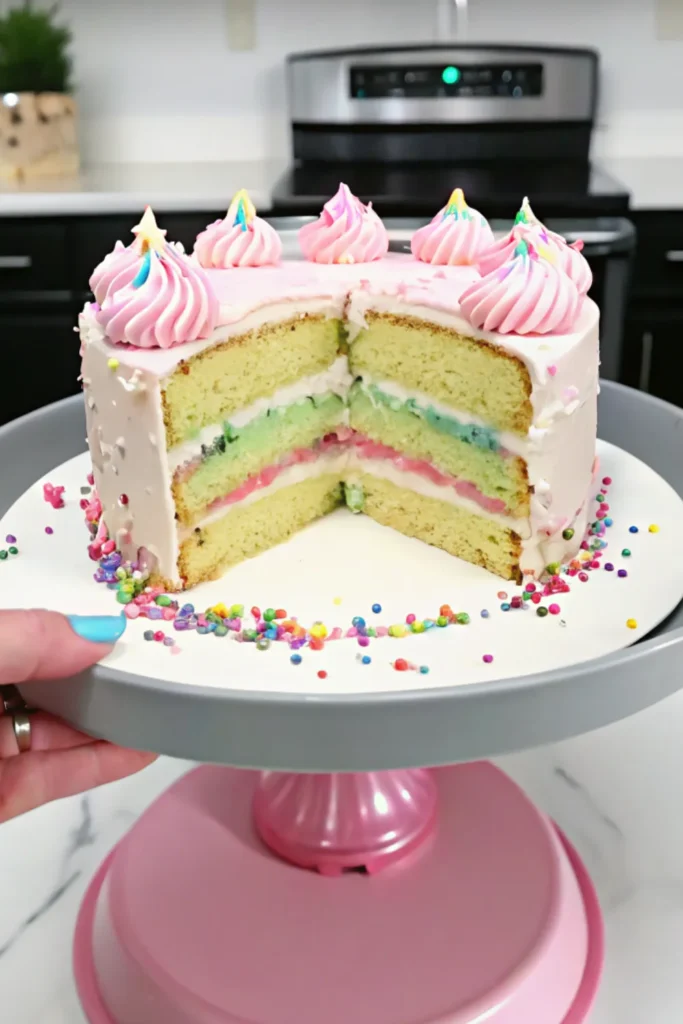
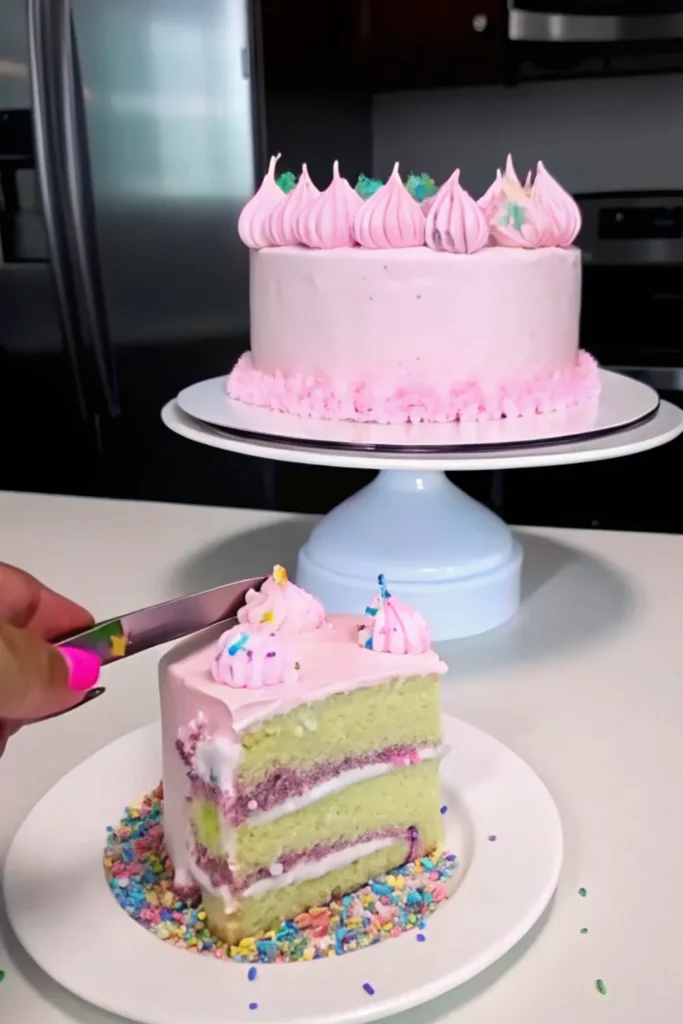
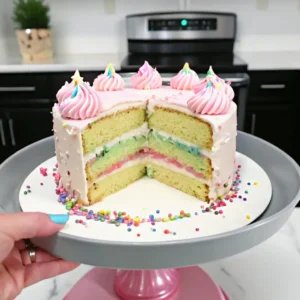
- STEP 7). Time to stack this beauty. Place one cake layer on your cake board and spread on a big, cozy layer of frosting. Keep going until all your layers are stacked. Frost the whole outside with a thin crumb coat and pop the cake in the freezer for five minutes. Quick chill time makes frosting life so much easier.
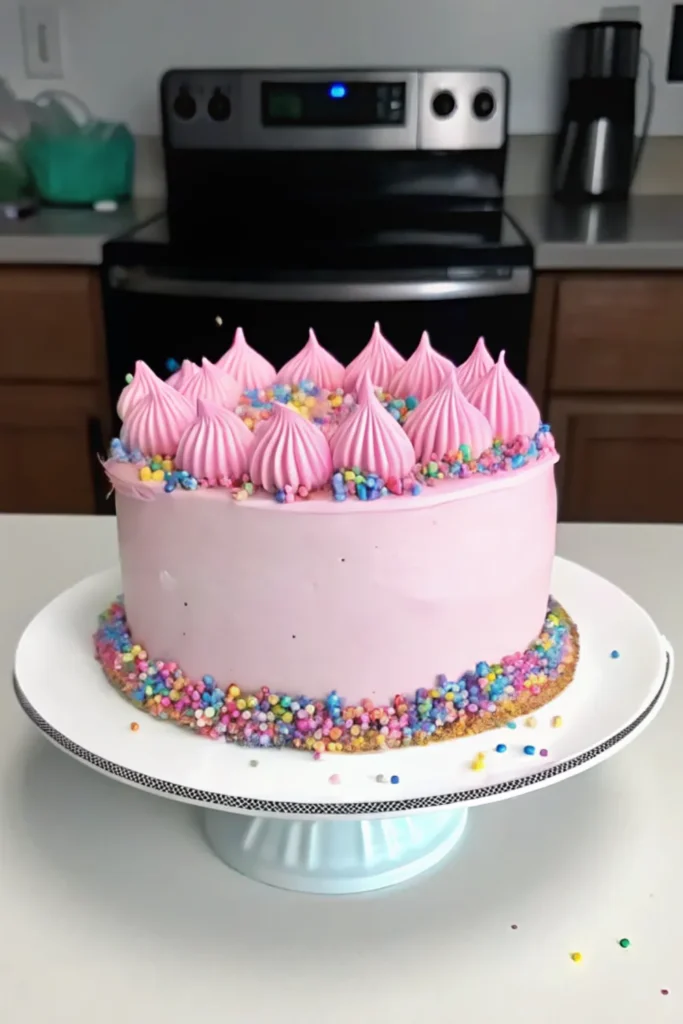
- STEP 8). Now cover the whole cake with the rest of the frosting. I’ll be honest, getting it super smooth is tricky since vegetable shortening doesn’t set like butter does. I had a few bumpy spots, but you know what, that’s cake life and I love it.
- STEP 9). Let’s go sprinkle crazy! Press vegan sprinkles around the bottom of the cake. Add more sprinkles on top and around the edges. You can totally make it your own here, go simple or go wild, both ways are awesome.
EXPERT COOKING TIPS FOR THE BEST VEGAN LAYER CAKE
- Mix by hand is your friend. You really don’t need an electric mixer here. Mixing by hand actually gives you more control, and it’s kinda satisfying to watch the batter come together.
- Add vinegar last. Trust me on this. The vinegar kicks off the magic with the baking soda. If you add it too early, you might lose some of that bubbly rise before you even get it in the oven.
- Chill between frosting layers. The crumb coat loves a quick freeze. Just five minutes in the freezer helps everything set up a bit and makes the final frosting layer way easier to smooth out.
- Don’t stress over perfect frosting. Vegetable shortening doesn’t behave like butter, so it’s okay if your cake isn’t perfectly smooth. I had some rough spots and honestly, the sprinkles covered everything. It still looked awesome!
- Use a kitchen scale if you can. It’s a small step that makes a big difference when you want those cake layers to bake evenly. Eyeballing works, but weighing just keeps things neat.
RECIPE FAQ
Do I have to use vegetable shortening for the frosting?
You don’t have to, but it does give the frosting that classic thick texture. If you want, you can try using vegan butter instead, but it might not hold its shape as well at room temperature.
Can I make this cake in a bigger pan?
Sure thing! If you use an eight-inch or nine-inch pan, you’ll probably just need to bake it a little longer. Keep an eye on it and do the good old toothpick test.
Do I really need parchment rounds?
Honestly, they make life easier. If you skip them, your cake might stick. I’ve been there, and it’s super frustrating when half the cake stays in the pan. Cutting parchment rounds is a little extra work, but it saves the day later.
VEGAN & ALLERGY-FRIENDLY SWAPS
- Almond milk swap: You can use oat milk, soy milk, or coconut milk if you need a nut-free option. Just make sure it’s unsweetened.
- Vegetable shortening swap: Vegan butter works as a backup, but remember it may not hold its shape as well when frosting.
- Almond flavoring swap: If you’re allergic to nuts or just don’t love almond, you can skip it completely or replace it with extra alcohol-free vanilla flavoring.
- Vegan sprinkles: Always double-check the label to make sure they don’t sneak in any non-vegan stuff like confectioner’s glaze. There are plenty of great brands out there.
NUTRITION BREAKDOWN
- Calories: About 450 per slice
- Protein: 3 grams
- Fat: 20 grams
- Carbohydrates: 65 grams
- Sugar: 45 grams
- Salt: 250 milligrams
These values are approximate and may vary depending on your ingredients and portion sizes.
This Vegan Layer Cake turned out to be one of my go-to bakes for any celebration. It’s easy, fun, and seriously delicious. I love that you can pull it together with simple ingredients and make it your own with different decorations or flavors. Whether you’re baking for a birthday, a random weekend, or just because you’re craving something sweet, this cake has got your back. Happy baking, my friend!
The Best Vegan Layer Cake for Any Occasion
Ingredients
Dry ingredients
- 2 ½ cups all-purpose flour
- 1 ¾ cups granulated sugar (use organic or certified vegan sugar)
- 1 ½ teaspoons baking soda
- ½ teaspoon salt
Wet ingredients
- 1 ½ cups unsweetened vanilla almond milk
- ⅔ cup vegetable oil
- 1 tablespoon alcohol-free vanilla flavoring
- 1 ½ teaspoons alcohol-free almond flavoring
- 1 tablespoon white vinegar
For the frosting
- 1 cup vegetable shortening
- 4 cups powdered sugar
- 1 tablespoon alcohol-free vanilla flavoring
- 1 teaspoon alcohol-free almond flavoring
- 1-2 tablespoons unsweetened vanilla almond milk (adjust for texture)
Decorations
- Vegan sprinkles
Instructions
- Grab a big bowl and toss in your flour, sugar, baking soda, and salt. Use a whisk and give everything a good mix. I like to think of this as waking up the dry ingredients and telling them it’s time to party!
- Now let’s bring in the wet crew. Pour in the almond milk and oil, then add that lovely alcohol-free vanilla flavoring and the almond flavoring. Mix, mix, mix until your batter looks smooth and there are no flour clumps hanging around. Seriously, don’t leave those sneaky lumps behind.
- Here comes the secret weapon, vinegar! This is what makes the cake rise and get all fluffy. Add the vinegar last and gently stir it in. You’ll see some bubbles popping up, and that’s our little science magic happening right there.
- Grab three six-inch cake pans and spray them with nonstick spray. Pop in parchment rounds at the bottom. I know cutting those circles is kinda annoying, but trust me, it’s worth it. Pour the batter evenly into the pans. I usually eyeball it, but if you want to be fancy, you can weigh them to make sure they’re even.
- Bake the cakes in a preheated oven at 350°F, that’s about 175°C, for 30 minutes. The waiting is the hardest part, right? Once they’re done, let them cool completely. You can level the tops if you want that super neat layered look, but honestly, they bake pretty flat already so no pressure.
- While your cakes are chilling, let’s whip up the frosting. Beat the vegetable shortening until it’s soft and smooth. Slowly add in the powdered sugar while mixing. Stir in the alcohol-free vanilla and almond flavorings. If it feels too thick, just splash in a little almond milk until it’s creamy but not runny.
- Time to stack this beauty. Place one cake layer on your cake board and spread on a big, cozy layer of frosting. Keep going until all your layers are stacked. Frost the whole outside with a thin crumb coat and pop the cake in the freezer for five minutes. Quick chill time makes frosting life so much easier.
- Now cover the whole cake with the rest of the frosting. I’ll be honest, getting it super smooth is tricky since vegetable shortening doesn’t set like butter does. I had a few bumpy spots, but you know what, that’s cake life and I love it.
- Let’s go sprinkle crazy! Press vegan sprinkles around the bottom of the cake. Add more sprinkles on top and around the edges. You can totally make it your own here, go simple or go wild, both ways are awesome.


