Vegan Marble Cake Recipe
This vegan marble cake is my go-to when I want something that feels fancy but comes together without a fuss.
You ever have one of those mornings where you’re standing in your kitchen, staring into the cabinet, hoping for a miracle to appear? That’s exactly how this cake was born. I was craving something sweet, comforting, and homemade. But I didn’t want anything too complicated. I also didn’t want to choose between chocolate and vanilla. So I didn’t.
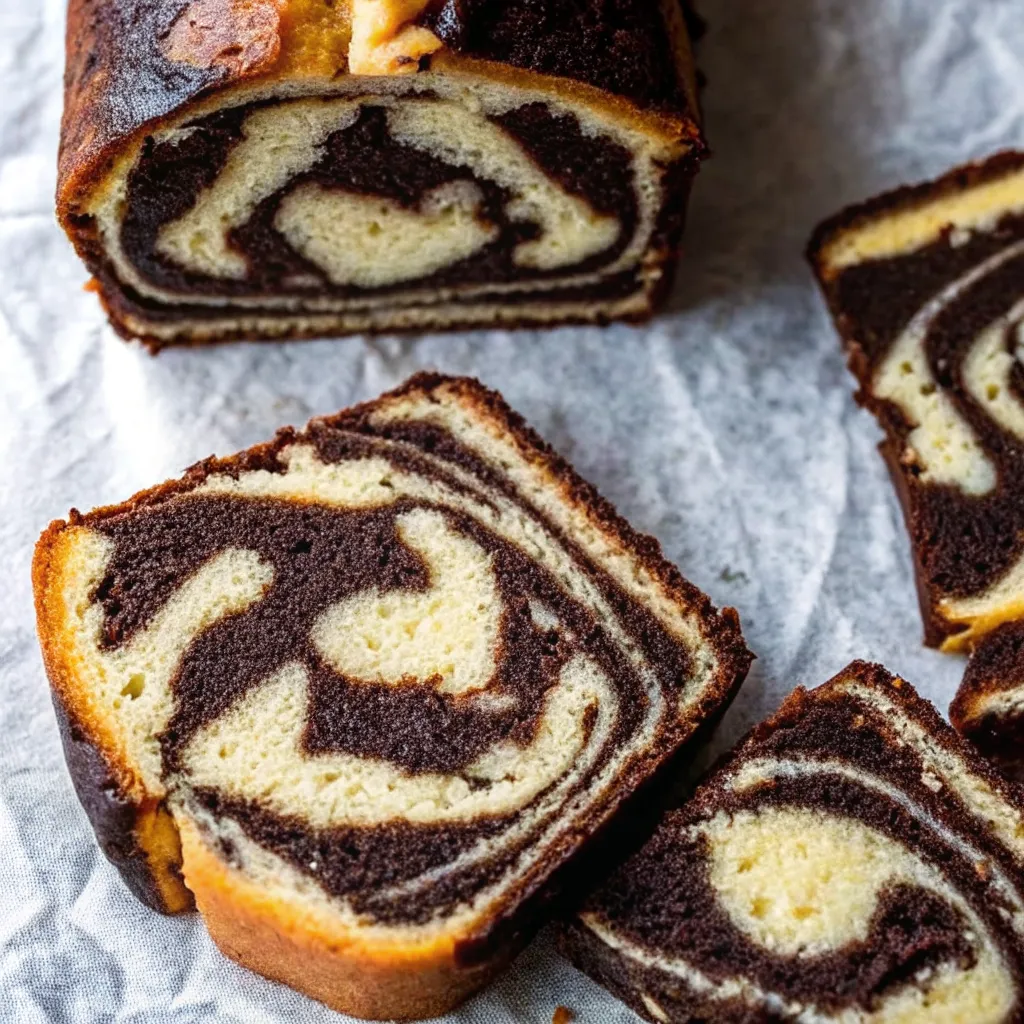
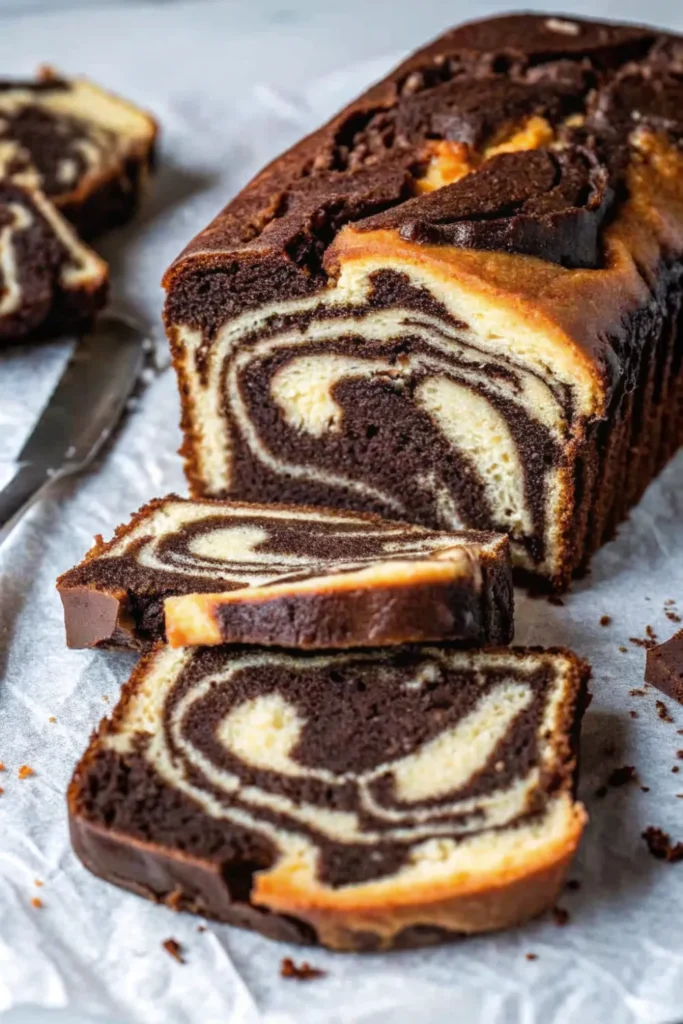
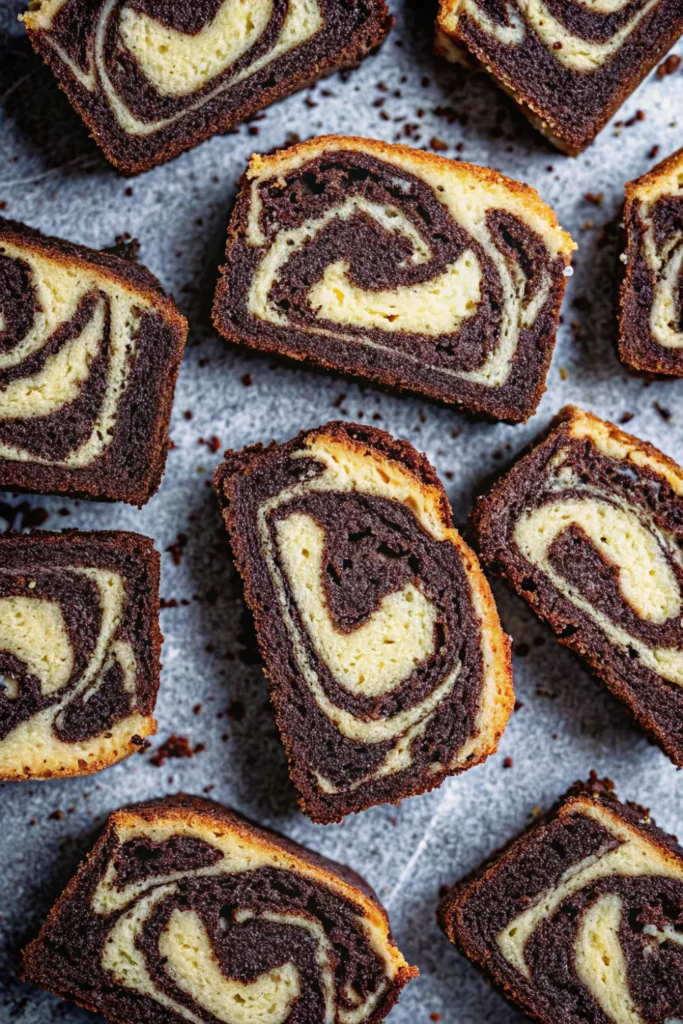
That swirl? Pure joy. Not just because it looks like something from a bakery window, but because it tastes like childhood and grown-up indulgence at the same time. This cake is moist, fluffy, and just dense enough to feel like a proper treat. And let me tell you, it makes the best breakfast with a hot cup of tea. No shame in that game.
I tested this thing more times than I care to admit. Mostly because I kept eating the results. And now that I’ve got it just right, I’m so excited to share it with you.
WHY THIS RECIPE WORKS
- It’s secretly easy to pull off – Sure, the swirls make it look like a pro-level bake, but it’s just some simple layering and a quick swirl with a knife. Nothing complicated or fussy here, promise.
- No eggs, no dairy, no problem – I leaned on silken tofu and plant milk to get the rich, moist texture you’d expect from a classic pound cake. Nobody will even guess it’s vegan.
- The flavor combo is unbeatable – Chocolate and vanilla are a forever pair. This cake gives you both in every bite, which honestly feels like cheating (but in the best way).
- You only need one bowl and a blender – Less cleanup = more time to eat cake. That’s the kind of kitchen math I live by.
- It works for breakfast and dessert – I’ve had a slice with my morning coffee and then snuck another after dinner. It’s sweet but not too sweet, which makes it totally acceptable any time of day.
- It holds together like a dream – This isn’t one of those crumbly, fall-apart vegan bakes. It slices beautifully and holds up if you want to bring it to a brunch or pack it for a snack.
INGREDIENTS
Wet ingredients
- 120g silken tofu (with excess liquid drained)
- 200ml unsweetened non-dairy milk (soy works best)
- 1 tablespoon halal vanilla flavoring (alcohol-free)
- 1½ teaspoons lemon juice (or halal vinegar)
Dry ingredients
- 240g plain flour (about 2 cups)
- 25g cornflour (around 2½ tablespoons)
- 1½ teaspoons baking powder
- ¼ teaspoon bicarbonate of soda (baking soda)
- ½ teaspoon salt
- 275g caster sugar (about 1⅓ cups)
Fats
- 120g melted vegan butter (½ cup, use halal-certified brand)
- 3 tablespoons neutral oil (sunflower, canola, vegetable, or mild olive)
Chocolate mixture
- 30g cocoa powder (3 tablespoons)
- 4 tablespoons boiling water
STEP BY STEP INSTRUCTIONS
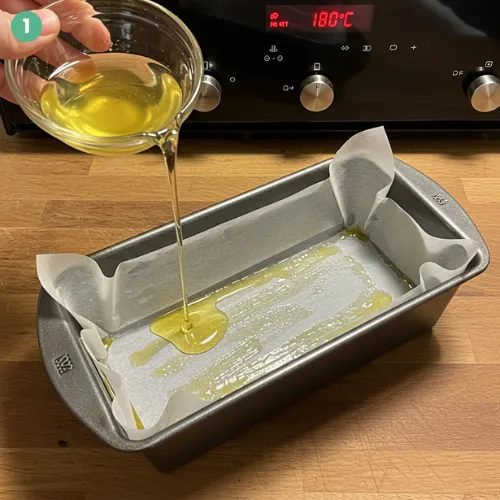
STEP 1). Preheat your oven to 180°C (160°C fan) or 350°F and grease a 2lb loaf tin (about 11.5 x 21.5 cm) with parchment paper lining the bottom.
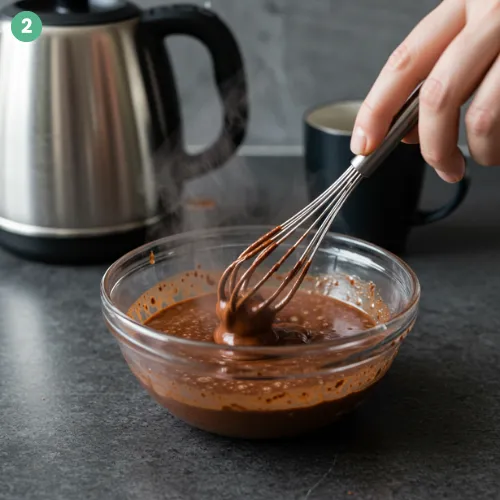
STEP 2). In a small bowl, mix the cocoa powder and boiling water until smooth, then set that aside to cool.
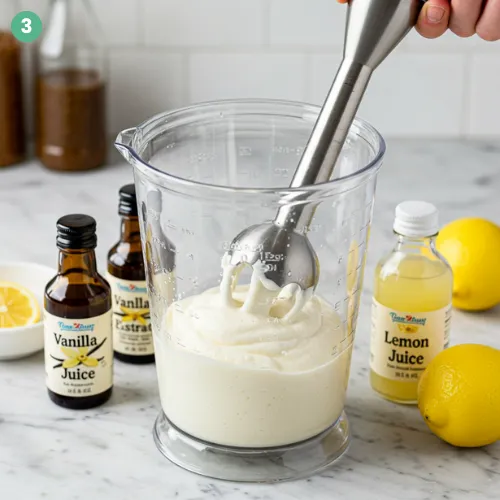
STEP 3). In a blender or using a stick blender, blend the tofu, non-dairy milk, vanilla flavoring, and lemon juice until the mixture is silky and totally smooth.
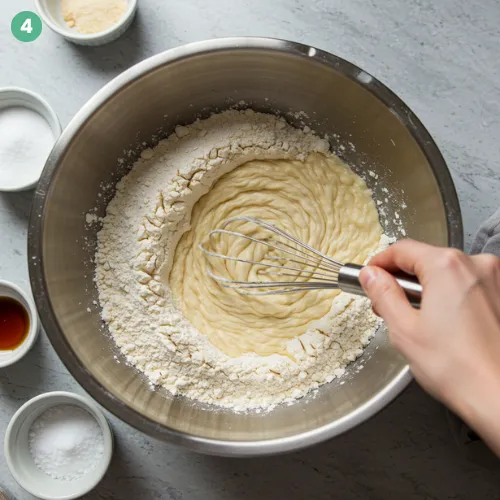
STEP 4). In a large mixing bowl, whisk together the flour, cornflour, baking powder, bicarbonate of soda, salt, and sugar until everything’s evenly combined.
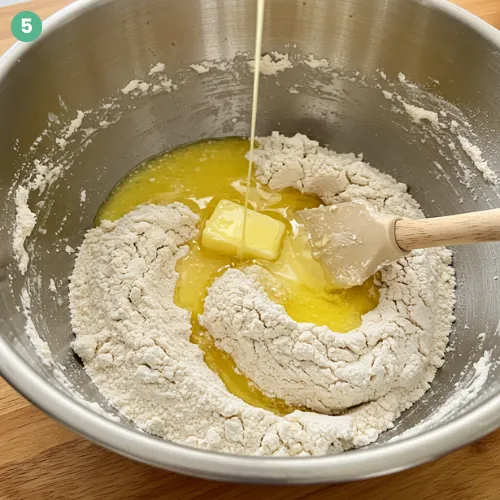
STEP 5). Pour the melted vegan butter and oil into the dry ingredients and stir until no dry patches remain and the mixture is fully moistened.
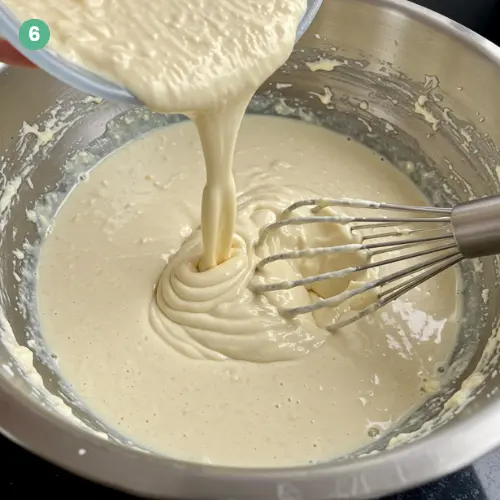
STEP 6). Slowly whisk the blended wet mixture into the bowl with the dry mix and stir until the batter is completely smooth and creamy.
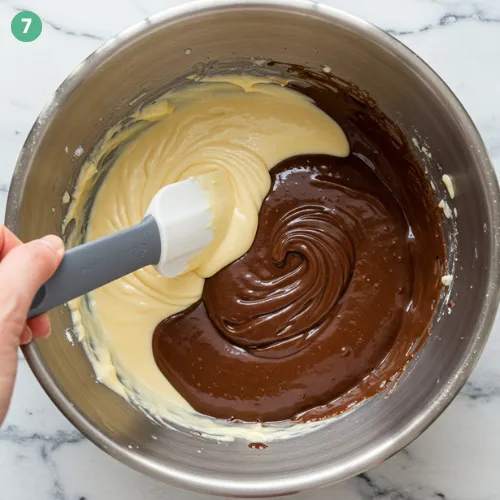
STEP 7). Scoop about 500g (just under half) of the batter into the cocoa paste and stir it until it becomes a smooth chocolate batter.
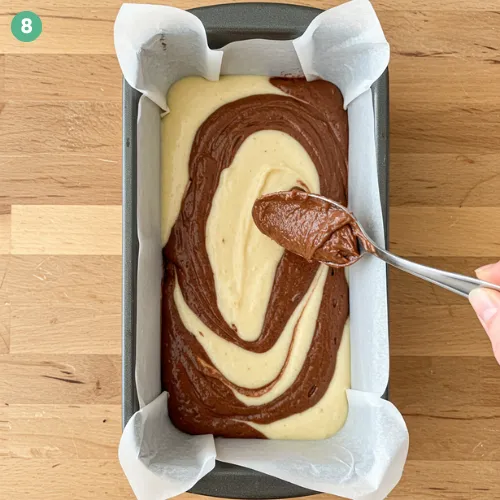
STEP 8). Layer the batters into your prepared loaf pan by alternating spoonfuls of vanilla and chocolate batter in three rounds, starting with vanilla.
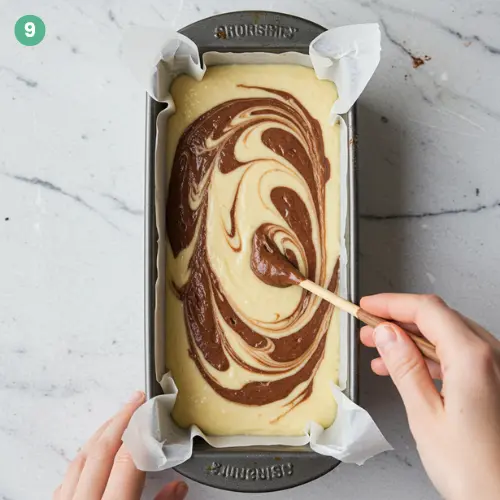
STEP 9). Drag a skewer or knife through the batter two or three times to gently swirl the colors without overmixing them.
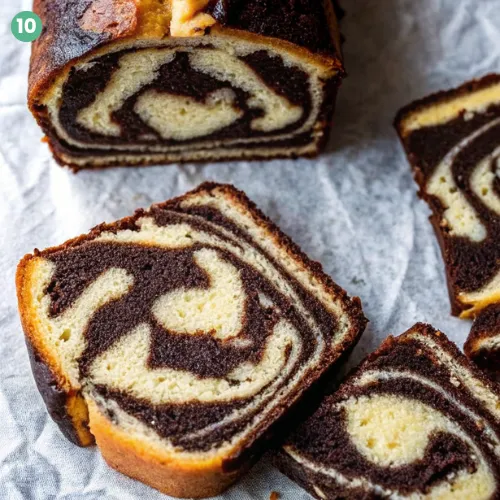
STEP 10). Bake for 60 to 75 minutes, checking around the 60-minute mark with a skewer—it should come out clean. Let the cake cool in the pan for 20 minutes, then transfer it to a wire rack and let it cool completely before slicing.
EXPERT COOKING TIPS FOR VEGAN MARBLE CAKE
- Use room temperature ingredients – Make sure your non-dairy milk and oil are at room temperature before you start. It helps everything blend together nicely without any lumps. I always take my milk out of the fridge an hour before I start baking!
- Don’t skip the vinegar – A bit of vinegar sounds strange, but trust me, it’s crucial. It reacts with the baking powder and gives your cake that lovely rise. I use apple cider vinegar, but you can also use white vinegar if that’s what you have on hand.
- Mix gently – When you’re swirling the two batters together, remember, less is more. You want those gorgeous, defined swirls, not a blended mess. A couple of swirls is all you need to create the beautiful marbling effect.
- Grease and line your pan well – This sounds basic, but if you don’t want your cake to stick to the pan and risk losing those perfect edges, take the time to line your pan with parchment paper. It’s a lifesaver!
- Use block vegan butter for the best texture – For a cake that’s soft, moist, and tender, stick with vegan block butter, not the spreadable kind in a tub. The tub versions are too watery for baking and can affect the texture.
RECIPE FAQ
What can I use instead of non-dairy milk?
Any non-dairy milk works here, but I love unsweetened soy milk because it has a nice, creamy texture and a high protein content. Almond milk, oat milk, or rice milk are all good options too, though they might slightly change the texture.
Can I freeze the cake?
Yes, you can definitely freeze this cake! Once it’s completely cool, wrap it up tightly in plastic wrap or foil, and pop it in the freezer. It’ll stay fresh for about 3 months. Just let it thaw at room temperature when you’re ready to eat it!
How can I make the cake extra chocolatey?
If you love chocolate, feel free to add some vegan chocolate chips to the batter! Just sprinkle them in when you’re mixing the wet and dry ingredients together. It’ll make the cake even more decadent!
VEGAN & ALLERGY-FRIENDLY SWAPS
- Silken tofu – If you’re not a fan of tofu or can’t find it, try using mashed bananas or unsweetened applesauce as a substitute. These will give the cake moisture, though the texture might be a bit lighter.
- Non-dairy milk – If you have a nut allergy, oat milk or rice milk are great alternatives to soy milk. They still give you a creamy texture without the risk of nuts.
- Vinegar – If you’re allergic to vinegar or just don’t have any on hand, lemon juice works just as well. It’ll help the cake rise and add a nice tangy flavor.
- Cornflour (cornstarch) – If you can’t use cornstarch, try using arrowroot powder or even additional plain flour. Both will help maintain the soft, tender texture of the cake.
- Vegan block butter – If you can’t find vegan block butter, a solid coconut oil (not the liquid kind) is a good swap, though it will add a slight coconut flavor. Just make sure it’s in a solid form for the best texture.
NUTRITION BREAKDOWN
- Calories: 250 per slice (based on 12 slices per cake)
- Protein: 3g per slice
- Fat: 12g per slice
- Carbohydrates: 35g per slice
- Sugar: 18g per slice
- Salt: 0.1g per slice
Note: These values are approximate and may vary depending on the specific ingredients you use.
And there you have it, my go-to vegan marble cake that never fails to impress. Whether you’re baking for a party, a quiet afternoon, or just to satisfy that cake craving, this recipe always delivers. It’s simple, it’s moist, it’s swirled with chocolate and vanilla goodness, and honestly, it’s one of those bakes that makes you feel like you’ve really nailed it. Keep this vegan marble cake in your back pocket because you’re gonna want to make it again and again.

Easy Vegan Marble Cake Recipe
Ingredients
Wet ingredients
- 120g silken tofu (with excess liquid drained)
- 200ml unsweetened non-dairy milk (soy works best)
- 1 tablespoon halal vanilla flavoring (alcohol-free)
- 1½ teaspoons lemon juice (or halal vinegar)
Dry ingredients
- 240g plain flour (about 2 cups)
- 25g cornflour (around 2½ tablespoons)
- 1½ teaspoons baking powder
- ¼ teaspoon bicarbonate of soda (baking soda)
- ½ teaspoon salt
- 275g caster sugar (about 1⅓ cups)
Fats
- 120g melted vegan butter (½ cup, use halal-certified brand)
- 3 tablespoons neutral oil (sunflower, canola, vegetable, or mild olive)
Chocolate mixture
- 30g cocoa powder (3 tablespoons)
- 4 tablespoons boiling water
Instructions
- Preheat your oven to 180°C (160°C fan) or 350°F and grease a 2lb loaf tin (about 11.5 x 21.5 cm) with parchment paper lining the bottom.
- In a small bowl, mix the cocoa powder and boiling water until smooth, then set that aside to cool.
- In a blender or using a stick blender, blend the tofu, non-dairy milk, vanilla flavoring, and lemon juice until the mixture is silky and totally smooth.
- In a large mixing bowl, whisk together the flour, cornflour, baking powder, bicarbonate of soda, salt, and sugar until everything’s evenly combined.
- Pour the melted vegan butter and oil into the dry ingredients and stir until no dry patches remain and the mixture is fully moistened.
- Slowly whisk the blended wet mixture into the bowl with the dry mix and stir until the batter is completely smooth and creamy.
- Scoop about 500g (just under half) of the batter into the cocoa paste and stir it until it becomes a smooth chocolate batter.
- Layer the batters into your prepared loaf pan by alternating spoonfuls of vanilla and chocolate batter in three rounds, starting with vanilla.
- Drag a skewer or knife through the batter two or three times to gently swirl the colors without overmixing them.
- Bake for 60 to 75 minutes, checking around the 60-minute mark with a skewer—it should come out clean. Let the cake cool in the pan for 20 minutes, then transfer it to a wire rack and let it cool completely before slicing.


You mentioned tofu in the method, but not listed in ingredients. How much?
Thanks for spotting that! I’ve added the tofu to the ingredients list.