Halloween Swiss Roll Cake That’s Spooky and Fun
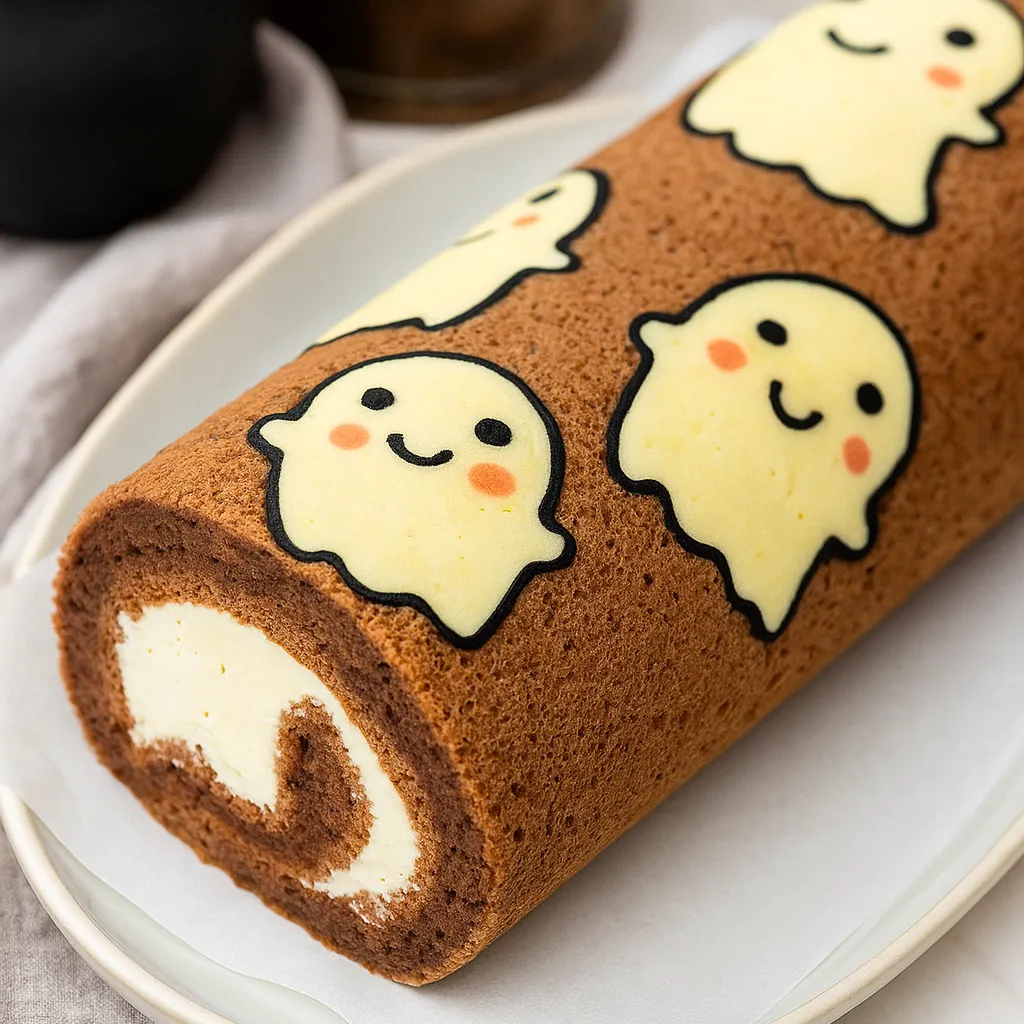
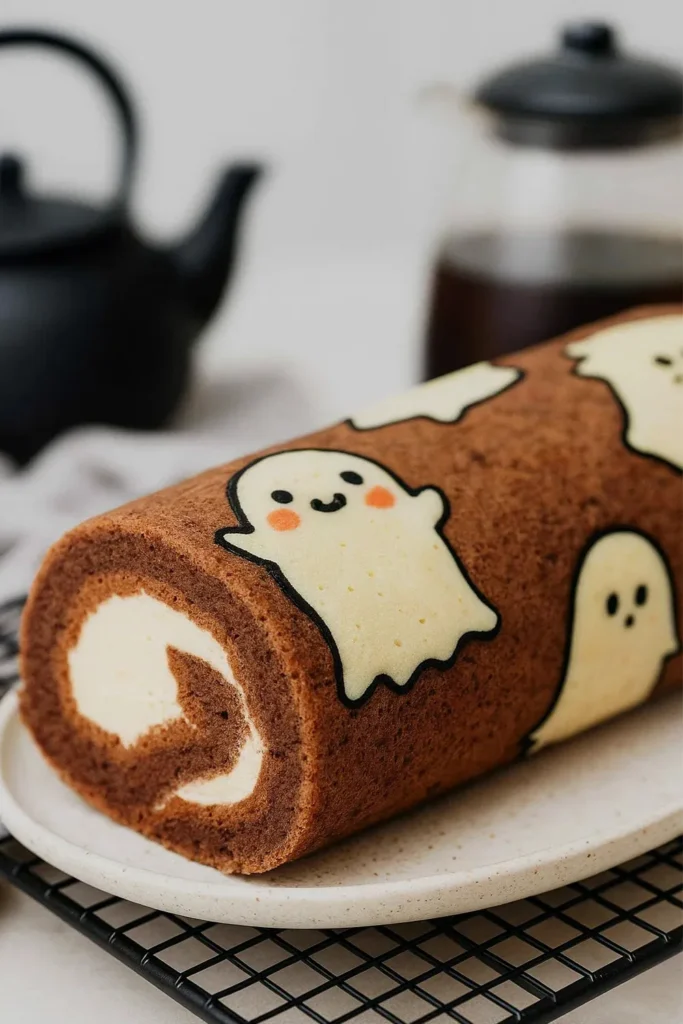
This Halloween Swiss roll Cake is one of those desserts that makes people’s eyes light up the second you bring it to the table. I mean, who wouldn’t love a soft chocolate sponge rolled up with whipped vanilla cream and decorated with spooky little ghosts? It’s festive, it’s fun, and honestly, it looks way harder to make than it actually is.
I still remember the first time I tested this recipe in my kitchen. I thought for sure the ghost design would end up smudged or stuck to the pan. But when I peeled back the parchment paper, there they were, perfect little ghosts staring back at me. I laughed out loud like a kid, and my husband thought I’d lost it. That’s the kind of joy this cake brings. It surprises you, and it makes the whole baking process feel like play.
So if you’ve been hunting for a Halloween dessert that’s cute but not cutesy, impressive without being impossible, and spooky in the most delicious way, this cake has your name on it. It’s the type of recipe that turns heads at parties, earns compliments from neighbors, and might even get you declared the “Halloween dessert champion” of your block.
WHY YOU WILL LOVE THIS RECIPE
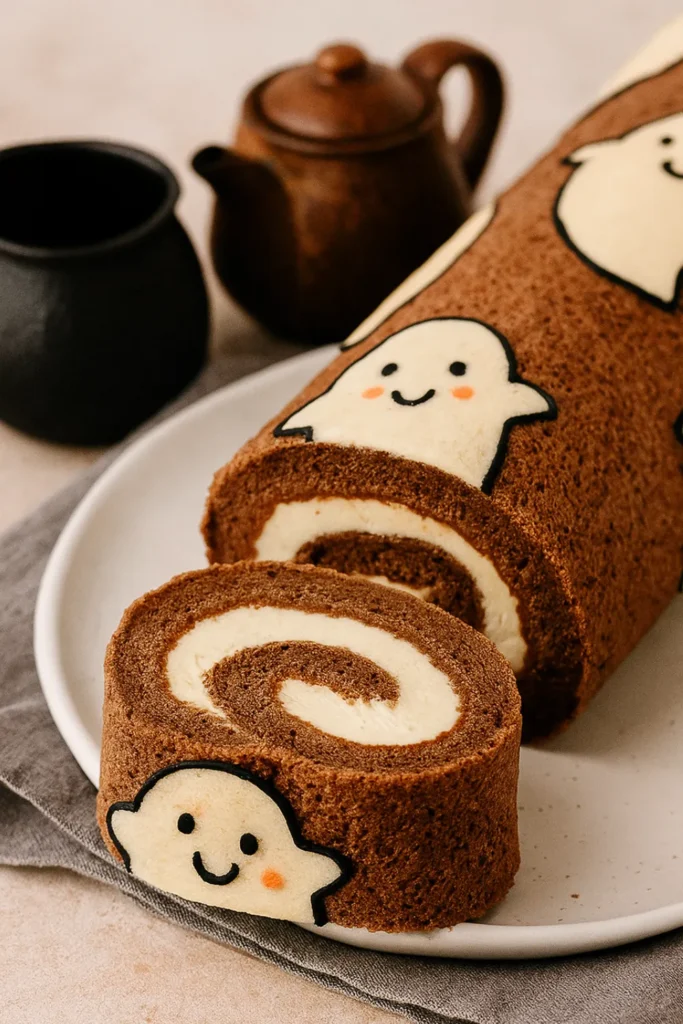
- Spooky and adorable design – The ghost pattern baked right into the sponge makes this cake stand out on any Halloween table. It looks like you spent hours decorating, but the trick is surprisingly simple once you know how.
- Light and fluffy texture – The chocolate sponge is soft, airy, and easy to roll without cracking. Paired with whipped vanilla cream, every bite feels indulgent but not too heavy.
- Perfect party centerpiece – This cake has serious wow factor. Slice it up and your guests will see the ghost faces on every piece, which always sparks smiles and a few gasps.
- Make-ahead friendly – You can prepare the roll in advance, let it rest in the fridge, and slice it right before serving. That means less stress on party day and more time to enjoy the fun.
- Customizable decorations – Ghosts are classic, but you can play with bats, pumpkins, or even spider webs if you want to mix things up. Once you learn the piping trick, the design possibilities are endless.
INGREDIENTS FOR HALLOWEEN SWISS ROLL CAKE
Ghost pattern batter
- 30 g cake flour (1/3 cup)
- 30 g butter, softened (2 tbsp)
- 30 g icing sugar (2 tbsp + 1 tsp)
- 30 g egg whites (about 1 egg white)
- Pink food coloring (a few drops)
- Black food coloring (a few drops)
Roll cake batter
- 25 g white sugar (I) (2 tbsp)
- 15 g cocoa powder (2 tbsp)
- 75 g cake flour (3/4 cup)
- 50 g milk (3 tbsp + 1 tsp)
- 50 g vegetable oil (1/4 cup)
- 4 egg yolks
- 4 egg whites
- 60 g white sugar (II) (1/4 cup + 2 tsp)
Vanilla whipped cream
- 150 g thickened cream (2/3 cup)
- 25 g white sugar (2 tbsp)
- 1 tsp vanilla bean paste or vanilla powder (alcohol-free)
STEP BY STEP INSTRUCTIONS
- STEP 1) Line a 25 x 30 cm jelly roll pan with parchment paper, then whisk together the cake flour, softened butter, icing sugar, and egg white until smooth to make the pattern batter.
- STEP 2) Tint a spoonful of batter pink, divide the rest in half, color one part black, and leave the other plain, then transfer each into piping bags and pipe ghost shapes onto the parchment, using a template if you prefer.
- STEP 3) Place the baking sheet with the ghost design in the freezer for 1 hour to set while you start on the cake batter.
- STEP 4) Preheat the oven to 160°C (320°F). Heat the milk in a small saucepan until steaming, then whisk it slowly into the egg yolks, vegetable oil, and sugar (I).
- STEP 5) Sift in the cocoa powder and flour, whisk until smooth, then set aside. In another bowl beat the egg whites until foamy, gradually add sugar (II), and whip until stiff peaks form.
- STEP 6) Fold the meringue into the yolk mixture in three additions until just combined, then pour the batter into the prepared pan over the frozen ghost design.
- STEP 7) Bake for 25 minutes, remove from the oven, and invert the cake onto a clean sheet of parchment paper. Peel off the design paper, place a kitchen towel on top, flip again, and roll the cake up with the towel inside. Let it cool completely.
- STEP 8) While the cake cools, whip the cream and sugar to soft peaks, add the vanilla bean paste, and beat until stiff peaks form.
- STEP 9) Gently unroll the cooled cake, remove the towel, spread the whipped cream evenly inside, then re-roll tightly, wrap in plastic wrap, and chill for at least 2 hours before slicing and serving.
EXPERT COOKING TIPS
- Chill the pattern batter. Freezing the ghost design before adding the cake batter is key, otherwise it will smear or disappear during baking. Give it at least an hour in the freezer so the shapes stay crisp.
- Don’t overmix the sponge. Once you fold in the egg whites, stop mixing as soon as everything looks combined. Overmixing will knock out the air and leave you with a flat cake that’s hard to roll.
- Roll while warm. Rolling the cake up with a towel while it’s still warm trains it into shape. If you wait until it cools, the sponge will likely crack when you try to roll it later.
- Use cold cream. Cold heavy cream whips better and holds its shape longer. Pop your bowl and beaters into the fridge for 10 minutes before whipping for the best results.
- Give it time to set. Resting the finished roll in the fridge for a couple of hours makes slicing so much easier. The cream firms up and the slices come out neat instead of messy.
RECIPE FAQ
What if I don’t have black or pink food coloring?
No problem. You can use cocoa powder for darker details and leave the ghosts plain white. They’ll still look adorable and spooky without extra colors.
Why did my cake crack when rolling?
Most likely it cooled too much before you rolled it. Always roll it up with a towel while it’s still warm, then unroll and fill it later once it has cooled completely.
Can I use a different filling instead of whipped cream?
Of course. Cream cheese frosting or chocolate buttercream also work great and give the roll a richer flavor.
HOW TO STORE YOUR SWISS ROLL CAKE
If you’ve got leftovers, don’t worry, this cake holds up beautifully. I like to wrap the roll tightly in plastic wrap and then slip it into an airtight container. That way the sponge stays soft and the cream filling doesn’t dry out. Stored this way, it will last about 3 days in the fridge.
If you want to make it further ahead, you can freeze it too. Just wrap the roll in plastic wrap, then in foil, and freeze for up to a month. When you’re ready to serve, thaw it overnight in the fridge before slicing. It comes out tasting just as good as the day you made it.
FUN WAYS TO DECORATE YOUR HALLOWEEN DESSERTS
One of the best parts about Halloween baking is how playful you can get with decorations. The ghost design on this roll cake is just the beginning. If you’re feeling creative, try piping little bats, pumpkins, or even spider webs right onto the parchment before freezing. Each slice will reveal a different design, which makes serving even more fun.
You can also dress up the finished roll with extra touches. A drizzle of melted chocolate on top looks dramatic, or you can dust it with powdered sugar for a ghostly finish. If you’ve got kids around, let them add candy eyes, sprinkles, or gummy worms. The sillier, the better—it’s Halloween after all.
I love how this Halloween Swiss Roll Cake turns out every single time. It’s light, creamy, and just spooky enough to steal the spotlight on your dessert table. The best part is watching people’s reactions when they see the little ghosts baked right into the cake. That never gets old.
So if you’re ready to surprise your family or impress your friends at the next Halloween get-together, give this recipe a go. It’s playful, it’s tasty, and it proves that sometimes baking really can be as fun as it looks.
Halloween Swiss Roll Cake That’s Spooky and Fun
Equipment
Ingredients
Ghost pattern batter
- 30 g cake flour (1/3 cup)
- 30 g butter, softened (2 tbsp)
- 30 g icing sugar (2 tbsp + 1 tsp)
- 30 g egg whites (about 1 egg white)
- Pink food coloring (a few drops)
- Black food coloring (a few drops)
Roll cake batter
- 25 g white sugar (I) (2 tbsp)
- 15 g cocoa powder (2 tbsp)
- 75 g cake flour (3/4 cup)
- 50 g milk (3 tbsp + 1 tsp)
- 50 g vegetable oil (1/4 cup)
- 4 egg yolks
- 4 egg whites
- 60 g white sugar (II) (1/4 cup + 2 tsp)
Vanilla whipped cream
- 150 g thickened cream (2/3 cup)
- 25 g white sugar (2 tbsp)
- 1 tsp vanilla bean paste or vanilla powder (alcohol-free)
Instructions
- Line a 25 x 30 cm jelly roll pan with parchment paper, then whisk together the cake flour, softened butter, icing sugar, and egg white until smooth to make the pattern batter.
- Tint a spoonful of batter pink, divide the rest in half, color one part black, and leave the other plain, then transfer each into piping bags and pipe ghost shapes onto the parchment, using a template if you prefer.
- Place the baking sheet with the ghost design in the freezer for 1 hour to set while you start on the cake batter.
- Preheat the oven to 160°C (320°F). Heat the milk in a small saucepan until steaming, then whisk it slowly into the egg yolks, vegetable oil, and sugar (I).
- Sift in the cocoa powder and flour, whisk until smooth, then set aside. In another bowl beat the egg whites until foamy, gradually add sugar (II), and whip until stiff peaks form.
- Fold the meringue into the yolk mixture in three additions until just combined, then pour the batter into the prepared pan over the frozen ghost design.
- Bake for 25 minutes, remove from the oven, and invert the cake onto a clean sheet of parchment paper. Peel off the design paper, place a kitchen towel on top, flip again, and roll the cake up with the towel inside. Let it cool completely.
- While the cake cools, whip the cream and sugar to soft peaks, add the vanilla bean paste, and beat until stiff peaks form.
- Gently unroll the cooled cake, remove the towel, spread the whipped cream evenly inside, then re-roll tightly, wrap in plastic wrap, and chill for at least 2 hours before slicing and serving.


