Vegan Cake Balls: Perfect Party Dessert
This vegan cake balls recipe is honestly one of the cutest, most fun desserts I’ve ever made! Have you ever been to a party and thought, “Man, I wish there were sweet little treats that are super easy to grab and just pop into my mouth?” Well, that’s exactly what I was thinking when I came up with these. They’re the perfect party dessert, simple, colorful, and just so much fun to make and eat.
You know, I’ve always believed that good food should make people smile. That’s why these vegan cake balls are such a winner! They’re soft, sweet, and the sprinkles just scream “celebration.” Plus, I love that you can make them ahead of time. When I made these for my niece’s birthday, everyone was so excited. I caught people sneaking back for seconds (and thirds). It was hilarious.
What I really enjoy about this recipe is how hands-on it is. Rolling those little cake balls felt like playing with dough as a kid, messy but in the best way. And the best part? You don’t need to be some fancy baker to nail this. Trust me, if I can do it while trying to keep my kitchen from looking like a sprinkle explosion, you totally can too!
These vegan cake balls are now my go-to whenever I need a dessert that looks like I put in a lot of effort but actually didn’t. And honestly, I feel kinda proud every time I pull these out at a party.

WHY YOU WILL LOVE THIS RECIPE
- Easy method – super simple steps that anyone can follow.
- Perfect party dessert – these cake balls are total crowd-pleasers.
- Make-ahead friendly – you can prepare them in advance and they’ll still taste amazing.
- Fun to make – rolling and decorating the cake balls is like arts and crafts in the kitchen.
- Kid-approved – little ones love the colorful sprinkles and bite-sized fun.
- Customizable – you can easily swap sprinkles, frosting, or cake flavors to match any theme.
INGREDIENTS FOR VEGAN CAKE BALLS
Dry ingredients
- All-purpose flour (for greasing the pan)
- 1 bag of vegan birthday cake mix
Wet ingredients
- 2/3 cup vanilla almond milk
- 1/2 cup melted coconut oil
- 1 tablespoon non-alcoholic vanilla flavoring
Frosting and decorations
- 1 and 1/2 containers of Miss Jones confetti pop frosting with sprinkles
- 1 lid of sprinkles (from the frosting)
- 1 bag of King David white chocolate chips
- 2 tablespoons vegetable oil
Extra tools and materials
- Earth Balance butter (for greasing the pan)
- Cake pop sticks
- Wax paper
- Plastic wrap
- An empty shoebox (no lid)
- Birthday gift wrap
- Floral foam
STEP BY STEP INSTRUCTIONS
- STEP 1). First, preheat your oven to 350°F. Grab a 9×13 inch pan and grease it using a little Earth Balance butter, then dust lightly with flour. This makes sure the cake doesn’t stick. I hate when that happens!
- STEP 2). Now heat the vanilla almond milk gently on the stove until it’s warm, but don’t let it boil. In another bowl, melt your coconut oil until it’s nice and liquid. Sift the vegan cake mix into a big bowl and pour in your warm almond milk, melted coconut oil, and non-alcoholic vanilla flavoring. Mix everything together with an electric mixer until creamy. Easy, right?
- STEP 3). Pour your cake batter into the greased pan, smooth it out evenly, and bake it right in the middle of the oven for about 30 minutes. To check if it’s ready, poke a toothpick into the middle. If it comes out clean, you’re golden. Let the cake cool completely before moving on. Seriously, patience pays off here.
- STEP 4). While the cake chills, let’s get crafty! Wrap your empty shoebox with some cheerful birthday gift wrap, leaving the opening on the bottom. Make a little hole in the top. That’s where your cake pops will stand later. Tape down any extra paper inside. It’s your little cake pop stand. Pretty cool, huh?
- STEP 5). Once your cake is cool, slice off the crispy edges and cut it into about 8 big pieces. In another bowl, mix together the frosting and one lid’s worth of sprinkles. Microwave the frosting for 15 seconds if it’s too thick. Then mash two cake pieces at a time into the frosting with a potato masher until everything’s doughy. Keep mashing until you’ve used all the cake and frosting.
- STEP 6). Scoop the cake dough with a melon baller or spoon, roll it into little balls with your hands, and set each one on a baking sheet covered with wax paper. Stick these in the fridge for at least 3 hours. I know waiting is hard, but trust me, it’s worth it.
- STEP 7). Next, melt about a quarter of the white chocolate chips in the microwave. Heat for 30 seconds, then stir. If needed, heat for another 15 seconds. Dip your cake pop sticks about an inch deep into the melted chocolate, then push each stick into a cake ball. This little bit of chocolate acts like glue. Set these back into the fridge for another hour to set firmly.
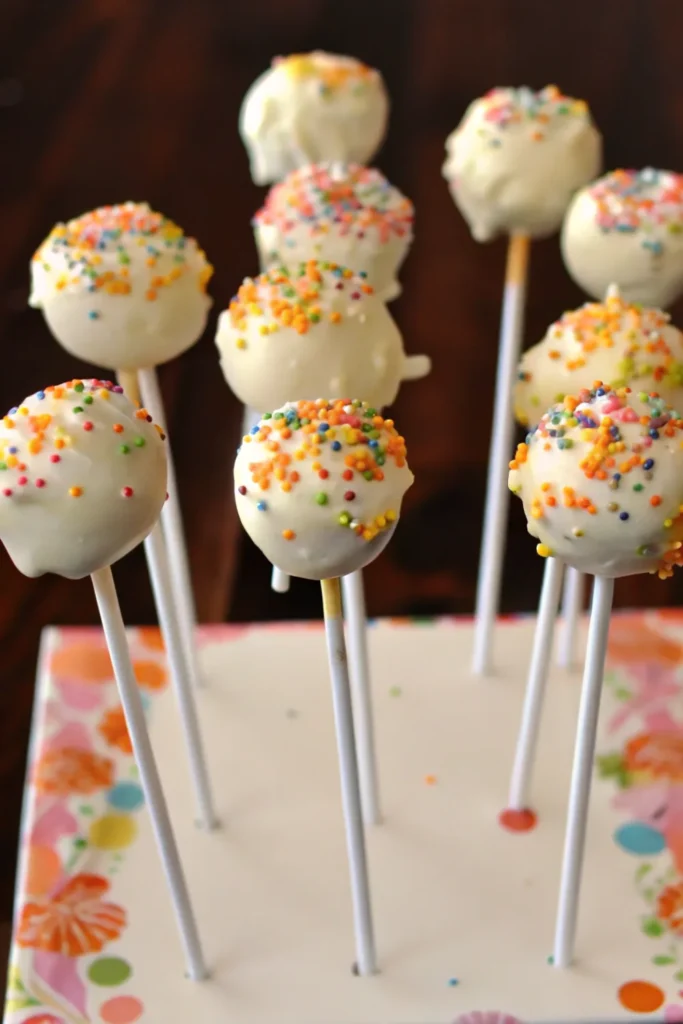
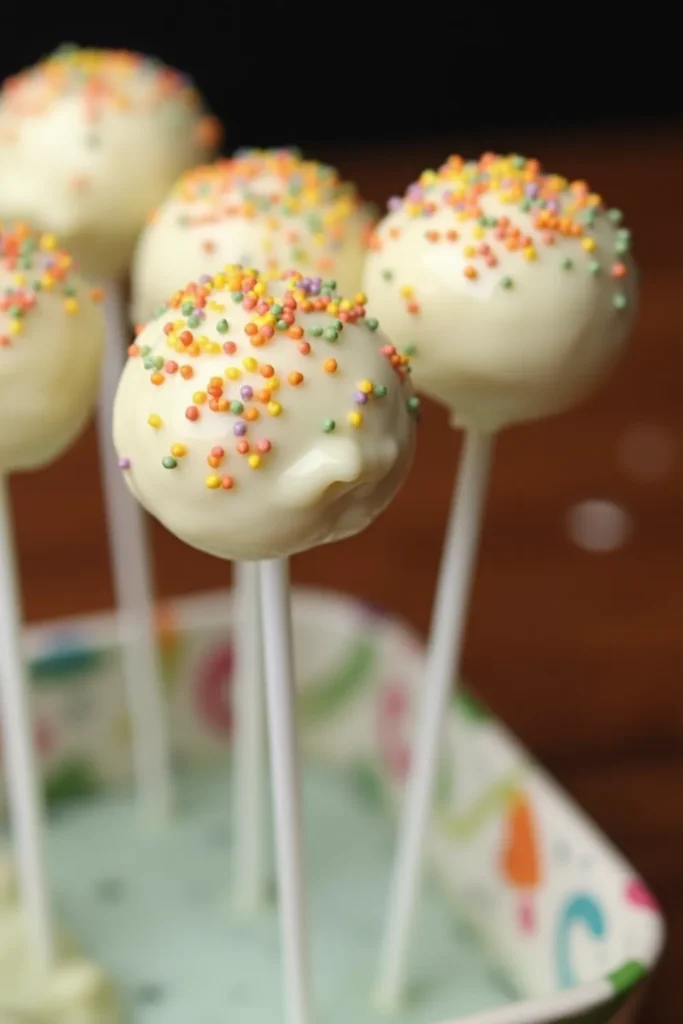
- STEP 8). Now the fun part, dipping! Melt half of your white chocolate chips again, heat for 30 seconds, stir, another 15 seconds if needed. Stir in 2 tablespoons of vegetable oil. Dip and twist each cake ball carefully until fully covered in chocolate. Add sprinkles right away before the chocolate sets. Pop each finished cake ball upright into your wrapped shoebox stand.
- STEP 9). Finally, chill the cake pops again until they’re completely set and ready to serve. You did it! You’ve made your own delicious vegan cake balls and they’re totally party-ready!
EXPERT COOKING TIPS FOR VEGAN CAKE BALLS
- Let the cake cool completely or the frosting will melt and turn into a sticky mess. I made that mistake once and it was not pretty. Trust me, cooling is key!
- Mash the cake and frosting in small batches. Trying to mash the whole cake at once just makes it harder to get that perfect dough texture. Smaller portions make it so much easier to mix evenly.
- Keep your cake balls cold before dipping. Warm cake balls tend to fall apart when you stick in the pop stick or dip them in chocolate. I learned this the hard way when one of mine slipped right off the stick and made a chocolate splash party.
- Work quickly when dipping and adding sprinkles. The chocolate can set faster than you think. If you wait too long, the sprinkles won’t stick and you’ll have sad, bare cake balls.
- Use vegetable oil to thin the melted chocolate. This makes it easier to get that smooth, glossy coat without it clumping up. I always add the oil after heating the chocolate and stir it in real good.
RECIPE FAQ
Can I freeze vegan cake balls?
Yes, you totally can! Just freeze them on a baking sheet first, then transfer them to a freezer bag. They can last up to a month. When you want to eat them, let them thaw in the fridge. I’ve done this and they still taste amazing.
Do I have to use a cake pop stand?
Not really. I made my own using a shoebox and some floral foam and it worked like a charm. You just need something to hold the pops upright while they set.
Can I use different frosting or sprinkles?
Oh for sure! You can switch up the frosting flavor or use different colored sprinkles to match any party theme. I love how flexible these cake balls are. It’s like dessert dress-up.
VEGAN & ALLERGY-FRIENDLY SWAPS
- Cake mix substitute: If you can’t find vegan birthday cake mix, you can use any vegan vanilla cake mix or even make your own from scratch with flour, sugar, baking powder, and plant milk. I’ve done both and they work great.
- Non-dairy milk options: Vanilla almond milk is awesome, but you can totally swap it for oat milk, soy milk, or coconut milk. Just use what you’ve got in your fridge.
- Butter alternative: I always use Earth Balance, but you can also use any plant-based margarine or even coconut oil to grease the pan.
- White chocolate chips swap: If King David white chocolate chips aren’t available, any dairy-free white chocolate works as long as you double-check the label.
- Gluten-free option: Use a gluten-free vegan cake mix if you’re baking for someone who can’t
NUTRITION BREAKDOWN
- Calories: Approximately 180 calories per cake ball
- Protein: About 1 gram per cake ball
- Fat: Roughly 9 grams per cake ball
- Carbohydrates: Around 24 grams per cake ball
- Sugar: About 15 grams per cake ball
- Salt: Less than 0.1 gram per cake ball
These nutrition values are approximate and can vary based on the exact ingredients and portion sizes you use. Honestly, I just focus on how good they taste!
These vegan cake balls are honestly the perfect party dessert. They’re fun to make, super cute to serve, and they always bring a little extra joy to the table. I love how easy they are, and every time I make them, people think I’ve worked some baking magic. They’re a sweet little treat that always gets everyone talking. So if you’re looking for a fun, no-fuss dessert that makes people smile, these vegan cake balls are where it’s at. Happy baking, my friend!
Vegan Cake Balls: Perfect Party Dessert
Ingredients
Dry ingredients
- All-purpose flour (for greasing the pan)
- 1 bag of vegan birthday cake mix
Wet ingredients
- 2/3 cup vanilla almond milk
- 1/2 cup melted coconut oil
- 1 tablespoon non-alcoholic vanilla flavoring
Frosting and decorations
- 1 and 1/2 containers of Miss Jones confetti pop frosting with sprinkles
- 1 lid of sprinkles (from the frosting)
- 1 bag of King David white chocolate chips
- 2 tablespoons vegetable oil
Extra tools and materials
- Earth Balance butter (for greasing the pan)
- Cake pop sticks
- Wax paper
- Plastic wrap
- An empty shoebox (no lid)
- Birthday gift wrap
- Floral foam
Instructions
- First, preheat your oven to 350°F. Grab a 9×13 inch pan and grease it using a little Earth Balance butter, then dust lightly with flour. This makes sure the cake doesn’t stick. I hate when that happens!
- Now heat the vanilla almond milk gently on the stove until it's warm, but don't let it boil. In another bowl, melt your coconut oil until it’s nice and liquid. Sift the vegan cake mix into a big bowl and pour in your warm almond milk, melted coconut oil, and non-alcoholic vanilla flavoring. Mix everything together with an electric mixer until creamy. Easy, right?
- Pour your cake batter into the greased pan, smooth it out evenly, and bake it right in the middle of the oven for about 30 minutes. To check if it's ready, poke a toothpick into the middle. If it comes out clean, you're golden. Let the cake cool completely before moving on. Seriously, patience pays off here.
- While the cake chills, let’s get crafty! Wrap your empty shoebox with some cheerful birthday gift wrap, leaving the opening on the bottom. Make a little hole in the top. That’s where your cake pops will stand later. Tape down any extra paper inside. It’s your little cake pop stand. Pretty cool, huh?
- Once your cake is cool, slice off the crispy edges and cut it into about 8 big pieces. In another bowl, mix together the frosting and one lid’s worth of sprinkles. Microwave the frosting for 15 seconds if it's too thick. Then mash two cake pieces at a time into the frosting with a potato masher until everything’s doughy. Keep mashing until you've used all the cake and frosting.
- Scoop the cake dough with a melon baller or spoon, roll it into little balls with your hands, and set each one on a baking sheet covered with wax paper. Stick these in the fridge for at least 3 hours. I know waiting is hard, but trust me, it’s worth it.
- Next, melt about a quarter of the white chocolate chips in the microwave. Heat for 30 seconds, then stir. If needed, heat for another 15 seconds. Dip your cake pop sticks about an inch deep into the melted chocolate, then push each stick into a cake ball. This little bit of chocolate acts like glue. Set these back into the fridge for another hour to set firmly.
- Now the fun part, dipping! Melt half of your white chocolate chips again, heat for 30 seconds, stir, another 15 seconds if needed. Stir in 2 tablespoons of vegetable oil. Dip and twist each cake ball carefully until fully covered in chocolate. Add sprinkles right away before the chocolate sets. Pop each finished cake ball upright into your wrapped shoebox stand.
- Finally, chill the cake pops again until they're completely set and ready to serve. You did it! You’ve made your own delicious vegan cake balls and they’re totally party-ready!


